Thursday, July 30, 2009

Slip Painting Experiments

Tried to slip paint w/ Copprclay for the first time today, I think I still need to work on getting the consistency just right..The leaf had three layers and the rest around half a dozen layers of slip- thank goodness I have a handy-dandy mug warmer to dry my pieces lickety-split.
My hand developed a bad habit of shaking at inopportune moments while trying to do close work on my fern, hence the slightly odd placement on some fronds. Is frond the right word? anyhoo, it was fun and I still need to settle on a design for my BIG hollow forms.

Wednesday, July 29, 2009

Is Bigger Better?

These pieces were total impulses yesterday when I had some time to play w/ Copprclay.
The long one is approx. 4" x 1-2/3" and weighs in at 48 grams- they're both hollow forms. The round-er one is 2-3/4" x 2-1/2" and weighs 45 grams. It's a good bit of clay at 93 grams total.
I have to give credit to my friend, Sadie, since we were admiring her beautiful copper clay pendant at our last get together in Walnut Creek. Hers was more similar to the rounder one, and it had started developing this wonderful patina that was shiny and iridescent in certain spots.
I'd like to try painting a pattern on w/ slip, but probably need to practice on a less important piece. The long one is calling for something botanical, at least on one side- maybe a fern..
Then again, it is Copprclay and can be enameled. So many choices!

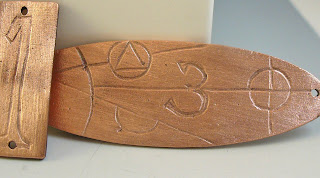
It's so nice to hold the long one in my hand, almost like a worry stone. I'm itching to get at least one done before the weekend's over, crossing my fingers it won't be crazy again like the last.

Monday, July 27, 2009

Faux Bone Finished..Finally

Just like the enamelled pieces, I've been meaning to get these photographed for more than a week now, so here they are:
I'm still not completely, totally happy w/ them, but I can always try again on a new piece.

Sunday, July 26, 2009

Enamel Experiments

I've had these pieces for more than a week waiting to be photographed. They're by no means professional, but I wasn't expecting much for my trial run w/ enameling. It was fun to play and get a feel for the process. The colors used were: bitter, cobalt and I believe the red was oriental red. The sample enamel kit is from Whole Lotta Whimsy and is a good way to learn before investing too much money. There are 12 colors in my kit and most of them are more primary/ bright than I normally would use since I love muted/tertiary colors. It is worth it though since I don't know what I'm doing exactly, lol, and if I mess up it's no big deal. These were pieces snipped from a thinner gauge of copper sheet I had laying around. I didn't think to bring some pieces of copprclay to play w/- next time.
I practiced sgraffito and I think the reason my pieces look so mottled is that I didn't let my white liquid enamel layer dry completely. What can I say, I was on borrowed time since my wonderful neighbor was watching Z for a few hours so I could try enameling.
Tomorrow I'll post some pics of my faux bone pieces I've also had sitting around for more than a week..


Tuesday, July 21, 2009

Glass Practice

It's been quite some time since I've had time to torch and it shows in my shaping and encasing skills. My plan is to make more time to devote to the torch so my skills don't get so rusty again.
After cleaning my space to make room to enamel, I discovered some old oddlots I hadn't used in quite some time. One of them is the silver rich K-65 from Double Helix Glassworks. They're the blue big holed beads in the pictures.

I also used Reich. Silver Brown, Aurae and some of its oddlots, GT Mountain Honey and Aether clear to encase.

Friday, July 17, 2009

WIP- Faux Bone and COPPRclay

Must hurry, Z is waking- coloring on faux bone, still working on them. Only had a chance to snap these shots real quick..be back later.

Sunday, July 12, 2009

More Carving on COPPRclay

I was hoping to have at least one of my faux bone pendants done to show for Monday, looks like I may get it done Monday evening or Tues morning. Carving metal clay and sawing out pieces of faux bone for pendants, etc have taken up my free time this weekend.
It does seems slightly easier to carve into freshly dried clay rather than one that's been laying around for weeks. Taught myself to rivet tonight also while trying to get one pendant put together, here's to getting more finishing done tomorrow.

These pics were hard to get right due to the reflection from the polished copper. I hope you can at least see some of the detail- should be much easier to see tomorrow when I hope to add some color, etc. to the surface.

Had an unfortunate accident w/ my diamond shaped number 9 pendant while polishing- it is somewhere in the dark abyss of my studio.. Which reminds me of a joke:

Why is 6 afraid of 7?

Because 7 ate 9!

Maybe it will show up in the light of day tomorrow. One can always hope.

Saturday, July 11, 2009

Carving Practice- Numbers

Thought I'd get some carving practice in since I haven't tried it yet for metal clay. These are back sides of pieces I haven't fired that have just been sitting around. I carved them in order: 7, 9, 3 and lastly 5. It's easier when the number is bigger w/ the size of nib I was using- a #1 on my Speedball cutter.
The numbers were free-handed w/ pencil onto the copper clay, this was pretty fun and relaxing..as long as you don't mess up, lol.
Another thing I'm wondering is whether it's a little easier to carve the pieces when the clay has just dried instead of these pieces that have been waiting for weeks to be fired? Hope to get around to testing my theory this afternoon if I have time.
Not sure what it is about using odd numbers, they seem to look better to me for some reason.

Thursday, July 9, 2009

New Beginnings- Faux Bone

I've had this sheet of 1/8" thick 8"x8" sheet of Faux Bone glaring at me for weeks now and I couldn't take it any more.
Although this is my first time using a jeweler's saw on my own, I don't think I did too bad..are you supposed to use beeswax when cutting faux bone? I didn't, but may try it next time just to see if it makes a difference.
Still deciding on designs and colors but it is exciting to have a blank canvas like this that is easy on the wallet.

There is still lots of finishing to be done, hope to get one piece completed by the weekend.

Thursday, July 2, 2009

The bracelet is fired and I'm so happy that all the links stayed together! The links' width is 1 mm to give you and idea of thickness.It's light and airy- I measured and it can be worn on the last link at 8-1/2" and fits me on the next to last length at 7-1/2".
The beadcaps are 9 mm, Copprclay daps like butta! I'm going to put a couple on a bead and see how the hole corresponds to a 3/32" mandrel. I tried to get a good pic of the bracelet on, but my camera died after only getting one shot..gotta find some more batteries.